|
Month #1 Week 3 The Spiders and Butterflies Investigation Stage Often many teachers and parents are confused, that the child, after coming to understanding how the program works, does not immediately carefully follow the pictures and just press down the keys corresponding to them. The reverse is true, the child might fall in love with different spiders and butterflies, and hold down the 'wrong' key for ages and watch the spider. Sometimes a few keys and spiders are produced together using the palm. Why does this happen? In each child lives an 'investigator.' An adult's goal is to play the pieces without mistakes. We grasp the logic immediately: press the wrong key–a spider appears. Hold one down too long–we see a butterfly. When don't hold one down for long enough–Mister Whoops. The child, however, does not have the skill for quick, logical deduction. To start with the gathers sensory and interaction experiences. He not only sees a spider or a butterfly, he is trying to get a feel for them, play with them, using his imagination. You don't have to interfere! By observing, you can just guide the child's actions with the help of positive comments and also 'musical money (I will tell you a little later about this tool).' The Solfeggio stickers with symbols of Italian note names presented with pictures of Door, Rain, Mirror, Farm, Salt, Ladder and Teacup. Soft Mozart Academy recommends using Solfeggio stickers for young beginners to promote music ear development through voice and singing. Please use the guides below to apply stickers. Meanings of the colors and shapes:
Why stickers?Using stickers will help to develop coordination and remove the stress and anxiety from the fear of pressing the wrong one of countless similar-looking piano keys when learning to play. Our stickers act as your musical road signs. With them you will never be lost and always will find the correct keyto play. The color scheme of these stickers creates a direct and subconscious visual association of piano keys with the music staff. This week we are going to start working on:For that, please, open the Soft Mozart folder and find the  Guess Key Module Guess Key Module Guess Key® teaches your child to find a piano key by note name or symbol. This is the best tool for training many important skills: eye-hand coordination, pitch recognition. fine motor skills, ability to focus on a moving object and shift eye focus between the computer screen and piano keys. 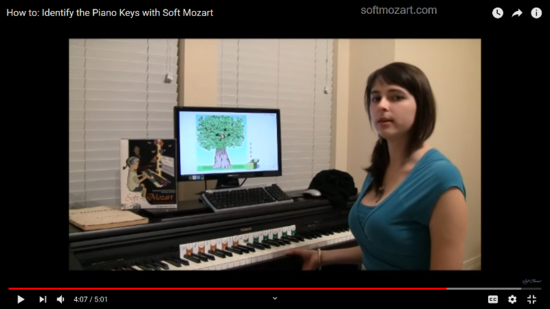 Rules Press any piano key with a note name (sticker) corresponding with a symbol on falling fruit or flower bud. If several notes in a row are played correctly (the number depends of the module stage), the program will switch to the next level of difficulty. Every correct note will give more points, but notes will move faster. Two mistakes in a row will switch the module to the lower level of difficulty. You have 7 different trees to complete to finish the module. Tips: Use any convenient octave on the piano keyboard. Play with only one hand, left or right. Try not to look at the piano keys while playing. Few words... The module concentrates on notes within a single octave, which helps the student to recognize the keys much faster, even without looking at the piano keyboard. This basic skill is crucial for piano playing because this key pattern is the same throughout all octaves. For beginners and small children, special key stickers may be used for orientation between keys. In advanced levels of difficulty, the rhythm of the program forces a student to use only finger touch and hand coordination to find the correct key, without looking at the piano keyboard. An advanced student can finish the module in 27 minutes (5 minutes module time), but the timing schedule for beginners should be used in moderation. Please, contact our professionals for your customized guidelines for playing this module! But this will happen in the future. Press F1 to stop the game. Write the score down like this Guess Key Module Date played _______ Time ______ Points _______ Try to give your child this module as often as you can. Always record the score! If your child is not struggling with finding the keys, ask him/her to SING the names of the notes.  To avoid the distraction of attention, you may visually allocate the area of piano keys:   Now let's tech your child to play 5-fingers exercise! First your baby should learn to place his/her thumb on the Middle Do (C) with weight. After that let's try to keep applying other fingers. How is it going?  Keep practicing the previous activities!  GENTLE PIANO GENTLE PIANODid you learn how to play the Theme from the 'Surprise' symphony so far? Was it hard for you? Ask your toddler to play Left hand! It won't be hard for him. If your child is feeling comfortable, ask to play the Right hand. It is just 7 notes, but don't push! Don't forget to visit the forum. Let us know, how you doing! Sincerely yours, Hellene Hiner PS Always check, if there any recital in the progress! You and your child will benefit a lot from the participation. Your place to start your Diary is here |
